Work with us


Maisara Caverns Guide: Boss Mechanics, Loot and M+ Tips for WoW Midnight
10 min read
Maisara Caverns Overview
Maisara Caverns sits beneath the Maisara Hills in Zul'Aman, one of the four major zones in WoW Midnight. The Vilebranch trolls have turned this place into a necromantic slaughterhouse. They are kidnapping Witherbark captives, sacrificing them for soul energy and feeding it all into Rak'tul, an undead monstrosity bound in the deepest chamber. It is dark stuff, even by WoW standards.
The dungeon is part of the Midnight Season 1 Mythic+ rotation and it has quickly earned a reputation as the toughest instance in the pool. Not because any single mechanic is unfair but because everything demands coordination. Interrupt rotations need to be tight. Positioning matters on every boss. And the trash between bosses will absolutely end a run if your group gets lazy with cooldowns.
Maisara Caverns Key Takeaways
- Maisara Caverns is a 3 boss dungeon in WoW Midnight Season 1 located in Zul'Aman at /way 43.0, 39.5
- Part of the Mythic+ rotation alongside 7 other dungeons. M+ keys go live March 24, 2026
- Widely considered the hardest dungeon in the Season 1 pool due to tight interrupt requirements and punishing boss mechanics
- Bosses: Muro'jin & Nekraxx (duo fight), Vordaza (necromancer) and Rak'tul, Vessel of Souls (final boss with intermission phases)
- You need to free 8 of 12 Witherbark Prisoners at the start before progressing. This can only be done out of combat
- Loot scales from 233 ilvl (Heroic) up through Mythic+ tiers. Notable drops include Vessel of Tortured Souls, Liferipper’s Cutlass and Traitor’s Talon.
Maisara Caverns Location and Entrance
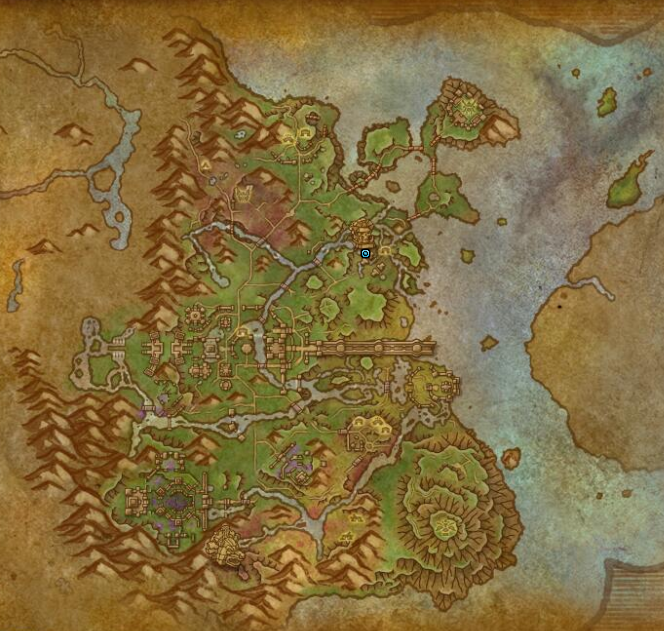
The Maisara Caverns entrance is in Zul'Aman, one of the four main zones in WoW Midnight.
The exact coordinates are /way 43.0, 39.5 in Zul'Aman.
You will find the entrance tucked into the hillside beneath the Maisara Hills, marked by troll architecture and a cave mouth that is hard to miss once you are in the area.
The fastest way to get to Maisara Caverns is to take the Rootway to Zul'Aman and fly southeast toward the coordinates.
Once you have timed a +10 Maisara Caverns key, you unlock a permanent dungeon teleport through the Keystone Hero achievement. This saves a ton of travel time later in the season when you are farming specific keys or targeting weekly vault slots.
Struggling with Maisara Caverns on higher keys? Our M+ team can handle any keystone level. Check out our WoW Mythic+ Boost services.
Maisara Caverns Quest: How to Unlock the Dungeon
The Maisara Caverns quest that unlocks the dungeon is called Maisara Caverns: Maisara Hungers. You pick it up during the Zul'Aman campaign storyline from Kul'amara the Fierce, a Witherbark troll leader who asks for your help rescuing her people from the Vilebranch.
Completing this quest unlocks Normal difficulty access even before you hit the level requirement. Alternatively, all characters automatically gain access to Maisara Caverns at level 85 regardless of quest progress. For Heroic difficulty and above you need level 90.
If you are leveling through Zul'Aman on your first character, you will naturally encounter this quest around level 83 to 85. On alts you can skip it all together since the dungeon opens at 85 anyway.
Maisara Caverns Dungeon Route
Before you pull a single mob, go right. The right path has a Cooking Pot in the troll house that gives your entire group Hearty Vilebranch Stew, a 30 minute buff granting 3% leech and 3% avoidance. It persists through death so it covers your entire run if you are on pace. The left side has a Cauldron that gives Ritual Concoction Buff, a nature damage proc that does basically nothing. Take the stew. Always take the stew.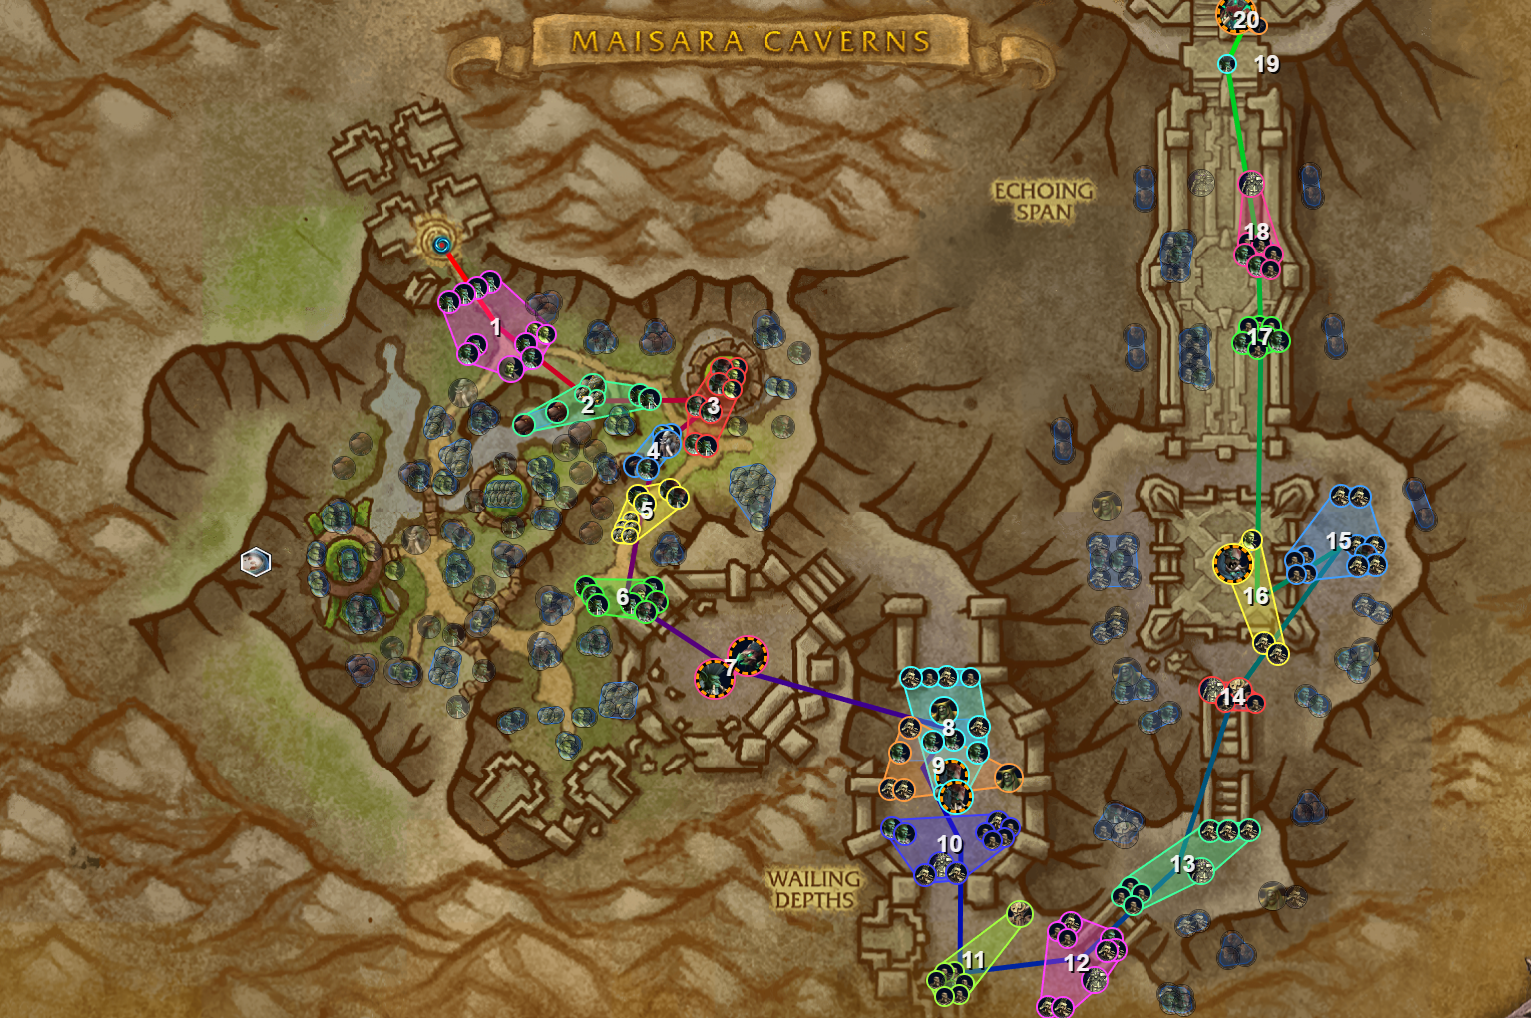
The standard PUG friendly route is:
- Go right, pick up the stew buff
- Clear trash and free 8 of 12 Witherbark Prisoners (must be out of combat to interact)
- Kill Muro'jin & Nekraxx
- Clear through the spirit halls, defeat the mini boss Rokh'zal to unseal the exit
- Push into Vordaza's wing
- Cross the bridge gauntlet (dodge shadow orbs, kill the drummer mini boss at the far end)
- Fight Rak'tul, Vessel of Souls
There’s one thing that catches new groups off guard: the Witherbark Prisoners can only be freed when nobody in the group is in combat. Clear the trash near each group of prisoners first, drop combat, then free them.
Both sides of the initial area also have Massive Freezing Traps you can interact with. They pacify your character and slow you by 50% but give you an extra action button that stuns your target for 5 seconds, even targets that are normally immune to CC. Save these for dangerous casts and powerful mobs.
After defeating the first boss, the room ahead has a mini boss, Rokh'zal near a central altar. On the outer walls near that altar you will find 4 Ritual Incense. If all four players interact with them (one per incense), a friendly Vengeful Shade spawns on the altar. A player out of combat can talk to the shade and get it as a combat pet for 60 seconds. The damage is underwhelming, so don’t go out of your way for it unless you happen to be standing right there.
Maisara Caverns Boss Guides
Boss 1: Muro'jin and Nekraxx
This is a duo encounter and the critical rule is simple: keep their health bars even. They do not share a health pool. If Muro'jin dies first, Nekraxx gets a stacking 20% damage increase every 4 seconds that will shred your tank. If Nekraxx dies first, Muro'jin starts casting Revive Pet and you have 10 seconds to finish him before his bird comes back at 35% health. Neither situation is good.
Muro'jin - the troll hunter:
Muro'jin periodically disengages away from the tank and casts Flanking Spear. This knocks the tank back and applies a 10 second bleed. Tanks should have a defensive ready and either cancel the knockback with a movement ability or close the gap quickly.
He also drops Freezing Traps under every player's position. These traps last 40 seconds before auto detonating and leaving behind frost puddles that persist for 3 minutes. Stepping into a trap incapacitates you for 8 seconds. This means your group needs to stay relatively close together and rotate around the room as space fills up. Do not spread randomly or you will trap the entire arena.
His third ability is Barrage, a frontal channel aimed at a random player. It follows the target and stacks a Magic debuff that slows with each hit. The target should stand still while everyone else moves out. The slow is annoying but there is no damage tied to it, so you can let it expire naturally rather than burning a dispel.
Nekraxx - the undead eagle:
Nekraxx casts Infected Pinions, applying a 30 second Disease to the entire party. This is the main source of group damage in the fight. Every Disease dispel your group has should be used here. Composition matters: the more Disease cleanses you bring, the smoother this fight feels.
The big ability is Carrion Swoop. Nekraxx targets a random player, charges in a line and hits for massive damage with a huge knockback into the air. The targeted player cannot dodge it. But there is a counter: if the target steps into one of Muro'jin's Freezing Traps before Carrion Swoop connects, Nekraxx flies into the ice block and gets stunned for 5 seconds. You have to be the one who triggers the trap. Nekraxx will not activate it just by flying over it.
This creates an interesting tension. You are dropping Freezing Traps everywhere and you need to avoid them, but you also need a couple alive for Carrion Swoop bait. Do not blow all your traps early. Keep one or two available near the current fight position.
Nekraxx also uses Fetid Quillstorm, a leap to a random player followed by an AoE impact that spawns circles to dodge. Nothing complicated, just move.
Tips for the fight:
- Keep both bosses in cleave range but not stacked directly on each other
- Rotate around the room as frost puddles fill the space
- Assign Disease dispels for Infected Pinions, this is the healer's biggest challenge
- The Carrion Swoop into Freezing Trap mechanic is satisfying when it works and humiliating when you miss it. Practice the timing
This boss duo is where most PUG groups start falling apart. If you need a clean Maisara Caverns clear for your weekly vault, our M+ carry team has you covered.
Boss 2: Vordaza
Vordaza is the Vilebranch's master necromancer and the one responsible for turning all those stolen souls into fuel for Rak'tul. Her fight is a mix of steady necrotic pressure and burst damage windows that test your DPS priority.
Core abilities:
Withering Miasma is passive damage that ticks on the entire group throughout the fight. This is the background pressure that makes everything else harder to heal through, especially when it overlaps with phantom detonations.
Drain Soul channels into the tank for heavy damage and applies a healing absorption. Tanks need a solid defensive rotation here because this hits hard and comes frequently.
Unmake is a frontal sweep that all players need to dodge. Tanks should keep Vordaza faced away from the group, and everyone needs to be ready to move when it comes out.
Wrest Phantoms summons Unstable Phantoms that chase players with Final Pursuit. Do not DPS the phantoms directly. Instead force two phantoms to collide with each other by having the targeted players run together. When phantoms collide, they explode and apply a 3 second stacking DoT to the whole group. Since the DoT stacks, wait for it to fall off before detonating the second pair of adds. Use CCs to hold the second set in place while the first DoT expires. This is especially dangerous in combination with the passive Withering Miasma damage, so healers need to be ready.
Necrotic Convergence is the burn phase. Vordaza wraps herself in Deathshroud, a massive shield that also makes her immune to interrupts. While the shield holds, damage ramps up against your whole party. This is where you pop offensive cooldowns and burn the shield down as fast as possible. The longer Deathshroud stays up, the more unmanageable the damage becomes.
Tips for the fight:
- Save offensive cooldowns for Necrotic Convergence, not the phantom phase
- Phantom management is about movement and timing, not damage. Collide them in pairs and wait for the DoT to drop between sets
- Dodge Unmake frontal sweeps. Tanks keep her faced away at all times
- Healers should prepare a big cooldown for each Necrotic Convergence window and watch for Withering Miasma overlapping with phantom DoTs
Boss 3: Rak'tul, Vessel of Souls
Rak'tul is the final boss and probably the reason you are reading this guide. He is a grotesque undead dire troll bloated with stolen soul energy and everything about this encounter is designed to overwhelm. The fight alternates between an active phase where you fight Rak'tul directly and an intermission triggered by Soulrending Roar.
Active phase abilities:
Deathgorged Vessel is a constant pulse of shadow damage to the entire group. It also creates circles on the ground that you need to dodge. This is the baseline pressure throughout the whole fight so your healer needs to maintain steady throughput at all times.
Spiritbreaker is a brutal tank combo. Rak'tul launches the tank into the air and pummels them, then drops a large puddle underneath them and knocks them back. Use your best defensive cooldown before it lands and move away from the group so the puddle does not block melee space. There are braziers at the front of the arena that can help mitigate the knockback, so position with those in mind.
Crush Souls targets 3 players and drops a Soulbind Totem at each of their locations with a small AoE hit. Try to drop these close together without cleaving your allies. Then focus the totems down immediately because they channel Soulbind into random players and pull them in. Leaving totems alive creates stacking pressure that quickly becomes unmanageable.
Intermission: Soulrending Roar
When Rak'tul uses Soulrending Roar, he sends the entire group down to the bridge below the arena. You need to run through a gauntlet to get back up. Withering Soul applies to everyone and deals increasing damage the longer you take, so move fast.
During the gauntlet, avoid Lost Souls pathing along the bridge. If you touch one it explodes and roots you with Cries of the Fallen, which eats precious time while the Withering Soul DoT ticks harder. You also need to interrupt or CC the 6 Malignant Souls scattered through the gauntlet. Each one you stop grants a stack of Spectral Residue, a stacking buff that helps your group in the next active phase. Do not skip these.
Tips for the fight:
- Position Rak'tul centrally so totems from Crush Souls are easy to group and focus down
- Tank: defensive on every Spiritbreaker without exception. Use the arena braziers to mitigate the knockback
- Kill Soulbind Totems fast. Do not ignore them
- During the bridge intermission, dodge Lost Souls and interrupt every Malignant Soul for the Spectral Residue buff
- Healers: Withering Soul ticks harder the longer the intermission goes. The fastest route back up saves the most healing
- On Tyrannical weeks, Rak'tul's intermission damage and Spiritbreaker hit scaling become genuinely murderous. Plan extra defensives
Rak'tul on Tyrannical is where keys go to die. If you want the clean weekly clear without the stress, check out our Mythic+ dungeon boost options.
Maisara Caverns Trash Tips
The trash in Maisara Caverns is not a filler. Several packs are legitimately harder than some bosses at higher key levels. Here are the mobs that will end your run if you ignore them:
Dread Souleaters are immune to CC and cast Necrotic Wave, which arcs to all nearby players and applies a healing absorb. Stagger your defensives and healing cooldowns. Rain of Toads creates avoidable circles.
Hex Guardians are also CC immune and constantly pulse AoE shadow damage through Searing Presence. Pulling one of these with other dangerous mobs is a recipe for a wipe. They also throw Ritual Firebrand (Magic debuff on 2 players) and Magma Surge (line attack at a random player).
Ritual Hexxers cast Hex on random players. This must be interrupted every single time. If it goes off, use a Magic dispel immediately. Their Shadow Bolt is lower priority but still worth kicking when you can.
Reanimated Warriors will try to Reanimate at low health. Use CC to stop the channel and finish them off. Their Dread Slash is a tank buster that gives them a stacking damage increase, so tanks need defensives at the end of long pulls.
Bound Defenders have Vigilant Defense, a frontal shield that reflects attacks. Tanks must face them away from the group. They also deal bonus AoE shadow damage on melee swings through Spectral Strikes.
The bridge section before Rak'tul has a mini boss named Zil'jan at the far end who channels Ritual Drums, sending shadow orbs bouncing down the bridge and dealing pulsing sonic damage to anyone within 70 yards. You need to dodge the orbs while pulling through the bridge trash. It is chaotic but the mobs on the bridge are ones you have already seen, so the mechanics should be familiar by this point.
Maisara Caverns Loot
All three bosses drop gear relevant to the Season 1 upgrade tracks. In M+, your loot scales based on your keystone level, with end of run rewards going up to the Myth track at higher keys. Great Vault rewards scale up to +18.
Notable drops by boss:
Muro'jin & Nekraxx:
Vordaza:
Rak'tul, Vessel of Souls:
Loot ilvl by difficulty:
Difficulty | Item Level | Upgrade Track |
Normal | 220 | Adventurer |
Heroic | 233 | Veteran |
Mythic 0 | 240 | Veteran |
Mythic+ (scales) | 240+ | Champion / Hero / Myth |
Note: Exact ilvl values for higher M+ keys follow the standard Season 1 scaling table. Great Vault rewards cap at +18 with Myth 4/6 gear.

Maisara Caverns FAQ
Where is the Maisara Caverns entrance in WoW Midnight?
The Maisara Caverns entrance is located in Zul'Aman at coordinates /way 43.0, 39.5. Look for the cave mouth beneath the Maisara Hills, framed by troll stonework. You can reach Zul'Aman through the Rootway system or via portals in Silvermoon City.
What quest unlocks Maisara Caverns?
The Maisara Caverns quest is called Maisara Caverns: Maisara Hungers. You pick it up from Kul'amara the Fierce during the Zul'Aman storyline around level 83 to 85. Alternatively, all characters unlock access at level 85 automatically without completing any quest.
What is the best Maisara Caverns route for M+?
The standard PUG friendly route goes right side first (pick up Hearty Vilebranch Stew from the Cooking Pot), clear trash while freeing 8 Witherbark Prisoners, kill Muro'jin & Nekraxx, clear the spirit halls through Rokh'zal, defeat Vordaza, cross the bridge gauntlet and finish on Rak'tul. Use Mythic Dungeon Tools to import a tested route before you zone in.
Is Maisara Caverns the hardest mythic dungeon in Season 1?
Most players and guide writers agree that it is. The combination of tight interrupt requirements, simultaneous boss mechanics and punishing trash packs gives it the highest skill floor in the rotation. Groups that execute cleanly will find it manageable, but mistakes snowball fast. Tyrannical weeks are especially rough here.
How many bosses are in Maisara Caverns?
Three: Muro'jin & Nekraxx (a duo fight), Vordaza and Rak'tul, Vessel of Souls. There are also two mini bosses: Rokh'zal in the spirit hall and Zil'jan on the bridge before the final boss.
What is the Maisara Caverns M+ timer?
The timer follows the standard Midnight Season 1 bracket and scales with your keystone level. The base timer is competitive but not punishing if your group routes efficiently and avoids unnecessary wipes. Timing a +10 unlocks the dungeon teleport portal.
How do I counter Carrion Swoop in the Muro'jin & Nekraxx fight?
The targeted player needs to step into one of Muro'jin's Freezing Traps before Nekraxx's Carrion Swoop connects. This causes Nekraxx to fly into the ice block and get stunned for 5 seconds. You must trigger the trap yourself by walking into it. Nekraxx will not activate traps by flying over them.
What should I do during Rak'tul's Soulrending Roar intermission?
Soulrending Roar sends your entire group down to the bridge below the arena. You need to run through a gauntlet back up while the Withering Soul debuff deals increasing damage. Avoid Lost Souls (they root you) and interrupt or CC the 6 Malignant Souls along the way to gain stacks of the Spectral Residue buff. Move fast because Withering Soul ticks harder the longer you take.
Ready to push Maisara Caverns keys without the headache? KingBoost's Mythic+ carry service handles any key level with experienced players who know every mechanic. Fast, clean and on your schedule.